 Anonymous

TEST BLOG PLEASE DISREGARD
- Home
- People
- nibbler
- Blog
- April 2023
- TEST BLOG PLEASE DISREGARD
TEST BLOG PLEASE DISREGARD
Published by nibbler on April 12th 2023.

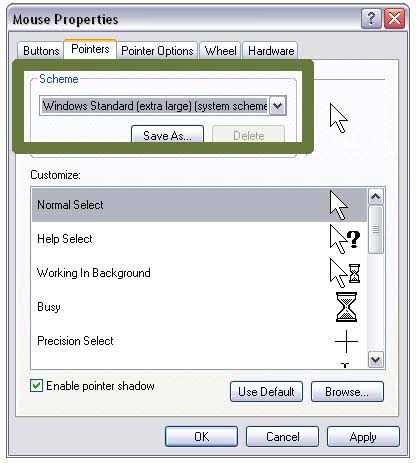
Access Windows mouse settings and select the cursor scheme and click apply. If you refer to apply through the RW Cursor Editor application, the configuration is done differently.
When starting new topics or responding to existing topics, making blog posts or gallery submissions, or just posting a comment, the following formatting rules apply.
Text Formatting
= heading 1 =
== heading 2 ==
=== heading 3 ===
heading 1
heading 2
heading 3
'''bold text'''bold text
''italic text''italic text
'''''bold and italic text'''''bold and italic text
---small text---small text
Type four lines in a row on a new line to make a separator:
----:-) ;-) :-o 8-) :-D :-( |-)


Make sure you put two spaces in between smileys to make multiple smiley display properly. Otherwise, if only one space is used, the next smiley won't show up properly. :-)
:-)  :-)
:-) 
The hyphens are not required to make a smiley.
* bullet 1
* bullet 2- bullet 1
- bullet 2
# numbered 1
# numbered 2- numbered 1
- numbered 2
Paragraph formatting
Leave a space before text in any line to disable formatting
like this>|<center paragraphscenter paragraphs
|-
|cell 1A|cell 1B
|-
|cell 2A|cell 2B| cell 1A | cell 1B |
| cell 2A | cell 2B |
Leave out the first |- to create a table without borders. Tables can also be centered:
>|<|-
>|<|cell 1A|cell 1B
>|<|-
>|<|cell 2A|cell 2B| cell 1A | cell 1B |
| cell 2A | cell 2B |
Also, make sure you press enter twice when you're finished with the table; otherwise, you will make tables with multiple lines in each cell.
Links and Media
Links on the rw-designer.com domain
[[forum/1574|link to the Posting Rules topic]]link to the Posting Rules topic
[[cursor-library|Main page of the cursor library]]Main page of the cursor library
Links to other sites
[http://www.duckduckgo.com homepage to the DuckDuckGo search engine]homepage to the DuckDuckGo search engine
Alt text goes after the link followed by a space before the alt text.
Images
[[image:i/logo.png|Optional alternate text]]
Images can only be from the rw-designer.com domain. If you want to add your own images, follow these steps:
- Go to your profile's blog.
- Click on Go to full editor
- Scroll all the way down to the bottom of the blog editor, where you can see an Upload new file button.
- Upload any image up to 1MB in size. Of course, you can upload other files if you want, as long as they are 1MB or smaller.
- Click on the image you uploaded and it will put the format code into the text box. Use it in any comment, blog post or cursor/icon set description if you wish.
Your images are saved in an "rsrc" directory in the blog editor.
[[image:rsrc/<name_of_your_image>.png|Optional alternate text]]If the image you are using is too big, you can make an auto-generated thumbnail instead.
[[image:rsrc/<name_of_your_image>.png|thumb:rsth/<name_of_your_image>.png|Optional alternate text]]Cursor/Icon Thumbnails
[[cursor:179402]]
[[icon:25388]]![]()
Cursor thumbnails are usually not animated. If you want to show it animated, use this:
[[image:cursor-view/179402.gif]]
You can also display the larger sizes by doing this (at the moment, 32x32, 48x48 and 64x64 are the only sizes usable):
[[image:cursor-view/179402-48.gif]] [[image:cursor-view/179402-64.gif]]

Icon thumbnails also only display as 32x32 images. Depending on what and how many resolutions the icon you want to use is, here is the code:
[[image:icon-image/25388-32x32x32.png]] [[image:icon-image/25388-32x32x8.png]] [[image:icon-image/25388-32x32x4.png]]![]()
![]()
![]()
There are 4 numbers: the icon ID, width and height, and the color depth (32 is smooth edges, 8 is 256 colors and 4 is 16 colors)
Videos
Videos must be uploaded to YouTube with an associating account. You must also choose the resolution you want the video to display as. Don't make it too big. I recommend 640x385 for most cases. Don't go overboard with this feature either.
[[youtube:pi7YtykfBLU|640x385]]Recent comments
 Anonymous
Find out how Vista icons differ from XP icons.
See how RealWorld Icon Editor handles Vista icons.